")


DIY birdhouse plans for beginners:
Building a birdhouse is a rewarding project for beginners, offering a way to attract birds to your garden while honing woodworking skills. However, without clear guidance, beginners often face challenges that can lead to frustration, wasted materials, or birdhouses that fail to attract birds. This guide breaks down the process, identifies common pitfalls, and provides actionable steps to create a functional and inviting birdhouse. By addressing these issues proactively, you’ll ensure a successful project that benefits both you and your local wildlife.
Breaking Down the Problem: Challenges in DIY Birdhouse Building:
The process of building a birdhouse can be daunting for beginners due to several components:
- Design Complexity:
- Beginners may choose overly intricate plans that require advanced skills or tools they don’t have.
- Poorly designed plans may not include critical features like proper ventilation or predator protection.
- Material Selection:
- Using inappropriate materials, such as treated wood that releases harmful chemicals, can deter birds or harm them.
- Choosing wood that’s too thin or not weather-resistant leads to quick deterioration.
- Construction Errors:
- Inaccurate measurements or cuts result in unstable structures or improper fit.
- Incorrect placement of the entrance hole or lack of drainage can make the birdhouse uninhabitable.
- Lack of Bird-Specific Knowledge:
- Different bird species have unique requirements for entrance hole size, interior dimensions, and mounting height.
- Ignoring these preferences means the birdhouse may remain unoccupied.
- Safety and Maintenance:
- Failing to account for predator-proofing (e.g., squirrels, cats) or cleaning access reduces the birdhouse’s lifespan and safety.
- Improper installation can cause the birdhouse to fall or become hazardous.
Common Causes of These Challenges:
- Inexperience: Beginners birds house often lack the woodworking or research skills to select reliable plans or materials.
- Overwhelm from Choices: The abundance of online plans can lead to decision paralysis or choosing unsuitable designs.
- Budget Constraints: Opting for cheaper materials to save money can compromise quality and functionality.
- Lack of Research: Not understanding local bird species or their needs results in generic, ineffective birdhouses.
- Rushing the Process: Skipping steps like sanding or sealing to finish quickly reduces durability and appeal.
Consequences of Not Addressing These Issues:
Failing to tackle these challenges can lead to:
- Wasted Resources: Time, money, and materials are lost on a birdhouse that doesn’t function or falls apart.
- Missed Opportunities: An unoccupied birdhouse means fewer birds in your garden, reducing natural pest control and enjoyment.
- Environmental Impact: Using harmful materials or improper disposal of failed projects can affect local wildlife.
- Discouragement: Repeated failures may deter beginners from pursuing woodworking or nature-focused hobbies.
- Safety Risks: Poorly built birdhouses can collapse, posing risks to birds, humans, or property.
Actionable Step-by-Step Solution: Building a Beginner-Friendly Birdhouse:
Follow these steps to create a simple, functional birdhouse tailored for common backyard birds like wrens, chickadees, or bluebirds.
Tools and Materials Needed;
- Tools: Hand saw, drill with 1.5-inch hole saw bit (for entrance), screwdriver, measuring tape, pencil, sandpaper.
- Materials:
- 1×6 cedar board (5–6 feet long, untreated for bird safety).
- 1.5-inch galvanized screws or nails.
- Exterior-grade wood glue (optional for extra stability).
- Non-toxic exterior paint or sealant (optional for weatherproofing).
- Safety Gear: Gloves, safety glasses.
- Resources: Free beginner plans from Audubon.org or Cornell Lab of Ornithology for species-specific designs.
Step 1: Research Local Birds and Choose a Plan;
- Action: Identify common birds in your area (e.g., wrens, chickadees). Use resources like Audubon’s bird guide or eBird to confirm species.
- Details:
- Wrens need a 1–1.25-inch entrance hole; bluebirds require 1.5 inches.
- Interior floor space should be around 4×4 inches for small birds, with a height of 8–12 inches.
- Why: Matching the birdhouse to local species ensures it will be used.
- Tip: Download a free, beginner-friendly plan from Audubon.org to avoid complex designs.
Step 2: Select Safe, Durable Materials;
- Action: Purchase untreated cedar or pine, which resists rot and is safe for birds.
- Details:
- Avoid pressure-treated wood, as it contains chemicals harmful to birds.
- Use 3/4-inch-thick boards for insulation and durability.
- Why: Proper materials ensure the birdhouse lasts multiple seasons and is safe.
- Tip: Check local hardware stores for cedar scraps to save costs.
Step 3: Cut and Prepare Wood Pieces;
- Action: Measure and cut the wood based on your plan. A basic wren birdhouse requires:
- Front and back: 4×8 inches (front needs a 1.25-inch entrance hole, 6 inches from bottom).
- Two sides: 4×6 inches (slanted tops for roof pitch).
- Roof: 6×6 inches (one piece slightly longer for overhang).
- Floor: 4×4 inches.
- Details:
- Use a pencil to mark measurements clearly.
- Sand all edges to remove splinters, ensuring safety for birds and yourself.
- Why: Precise cuts ensure a snug fit and stable structure.
- Tip: Double-check measurements before cutting to avoid waste.
Step 4: Assemble the Birdhouse;
- Action: Assemble the pieces in this order:
- Drill drainage holes (1/4-inch) in the floor corners.
- Attach sides to the back panel with screws or nails.
- Secure the floor, recessing it 1/4 inch for drainage.
- Attach the front panel, ensuring the entrance hole is at the correct height.
- Add the roof, using hinges on one side for cleaning access (optional but recommended).
- Details:
- Pre-drill holes to prevent wood splitting.
- Use wood glue for extra strength if desired.
- Why: A secure assembly prevents leaks and predator entry.
- Tip: Test-fit pieces before screwing to confirm alignment.
Step 5: Add Bird-Friendly Features;
- Action:
- Drill small ventilation holes (1/4-inch) near the top of the sides.
- Attach a predator guard (e.g., a metal washer around the entrance) to deter squirrels.
- Ensure the roof overhangs by at least 1 inch to protect from rain.
- Details:
- Avoid perches, as they help predators more than birds.
- If painting, use light colors to reflect heat and non-toxic paint.
- Why: These features make the birdhouse safe and comfortable for nesting.
- Tip: Check plans for species-specific tweaks, like deeper cavities for bluebirds.
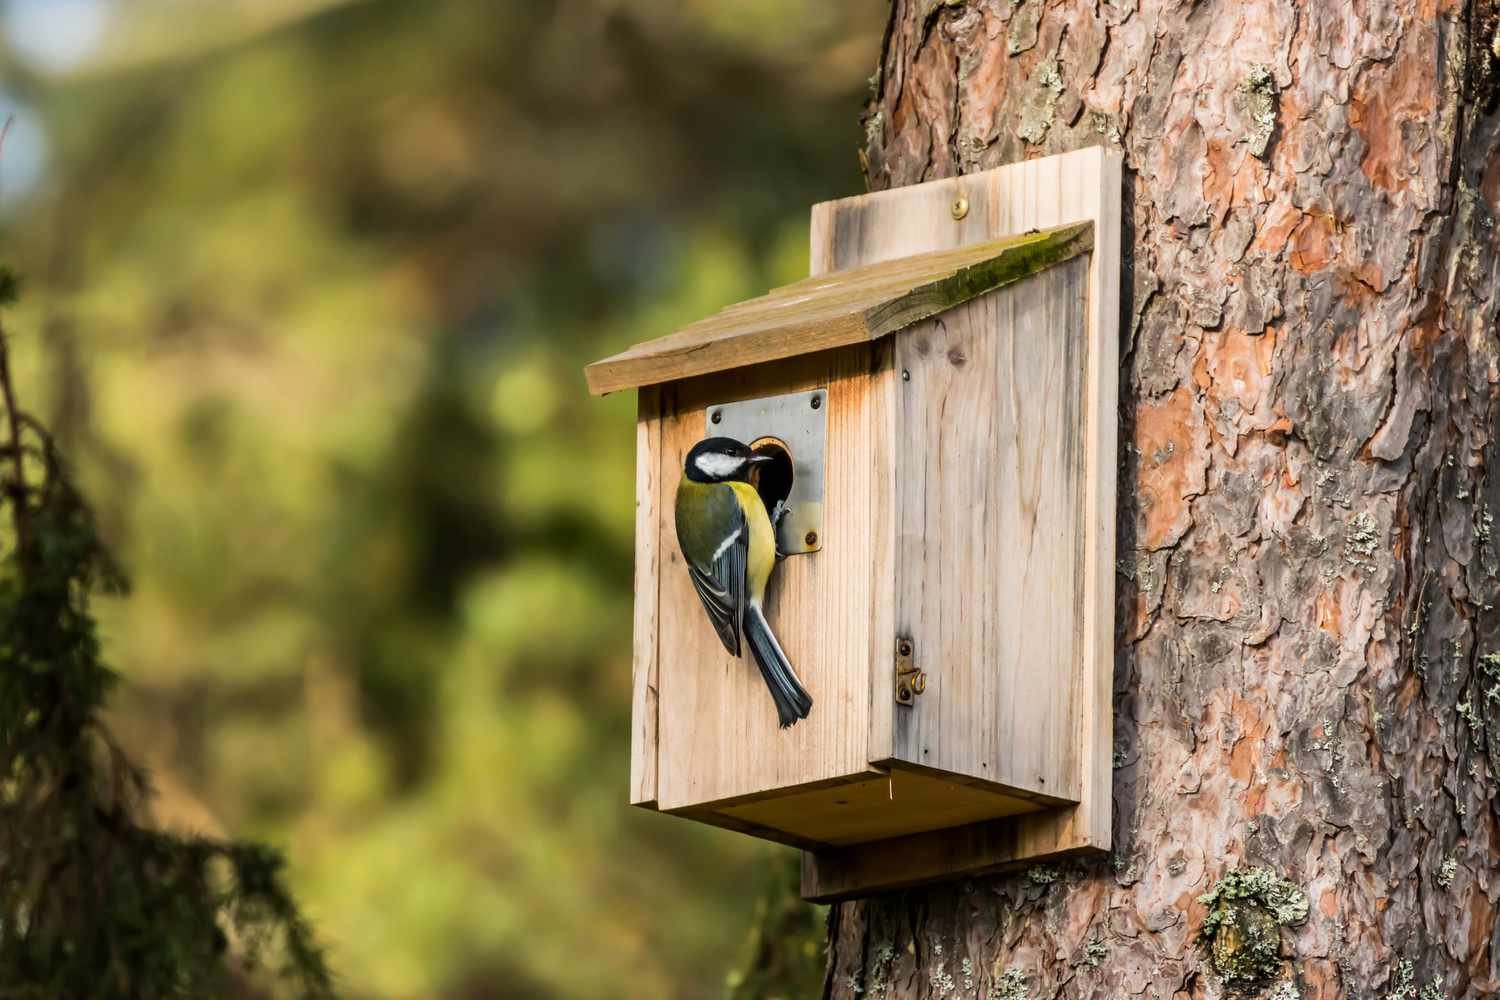
Step 6: Install the Birdhouse;
- Action:
- Mount the birdhouse 5–10 feet high on a pole or tree in a quiet, shaded area.
- Face the entrance away from prevailing winds (often east or south in the U.S.).
- Use a baffle on the pole to block climbing predators.
- Details:
- Install before breeding season (early spring for most birds).
- Avoid busy areas to reduce disturbance.
- Why: Proper placement maximizes bird attraction and safety.
- Tip: Secure with sturdy brackets to withstand wind.
Step 7: Maintain the Birdhouse;
- Action:
- Clean out old nests annually in late fall or winter.
- Inspect for damage and reseal with non-toxic sealant as needed.
- Details:
- Wear gloves to avoid parasites in old nests.
- Store cleaning tools separately to avoid contamination.
- Why: Regular maintenance extends the birdhouse’s life and encourages return visitors.
- Tip: Keep a log of bird activity to track success.
Real-World Example: A Beginner’s Success Story:
Case Study: Sarah, a novice woodworker in Ohio, wanted to build a birdhouse for her backyard chickadees. Initially, she chose a complex online plan requiring a jigsaw she didn’t own, leading to uneven cuts and frustration. After researching, she switched to a simple Audubon wren plan, using cedar from a local hardware store. Following steps like precise measurements, sanding, and adding ventilation holes, she built a sturdy birdhouse in one weekend. Sarah mounted it on a pole with a baffle, and within two weeks, a chickadee pair moved in. Her success came from matching the design to local birds, using beginner-friendly tools, and prioritizing safety features. Sarah now maintains the birdhouse annually and has started a second one for bluebirds.
Additional Tips for Preventing Future Issues:
- Start Small: Stick to basic designs until you’re confident with tools and techniques.
- Learn Continuously: Follow blogs or join local birdwatching groups to understand bird preferences better.
- Invest in Quality: Spend a bit more on durable wood to avoid frequent replacements.
- Document Your Work: Take photos of each step to troubleshoot errors in future projects.
- Engage Kids or Friends: Turn birdhouse-building into a group activity to share knowledge and make it fun.
- Check Regulations: Ensure your installation complies with local wildlife or homeowner association rules.
Next Steps and Call to Action:
You’re now equipped to build a beginner-friendly birdhouse that attracts local birds and boosts your woodworking confidence. Don’t let inexperience or overwhelm hold you back—start today with these clear steps:
- Today: Research local birds and download a free plan from Audubon.org or Cornell Lab.
- This Weekend: Visit a hardware store for cedar and basic tools, aiming for under $20.
- Next Week: Build your birdhouse, following the steps above, and install it in your yard.
- Ongoing: Monitor bird activity and clean the birdhouse annually to keep it inviting.
Take action now—grab a pencil, pick a plan, and start building a home for your feathered neighbors. Your backyard will soon be alive with chirps, and you’ll have a project to be proud of! If you need more guidance, check Audubon’s resources or ask me for tailored advice. Happy building!